Self-hosted Data Lake Platform with DuckDB, DuckLake and Shaper
Do you need to store and analyze large amounts of data without breaking the bank? Do you need to run in your own infrastructure instead of relying on the big cloud providers?
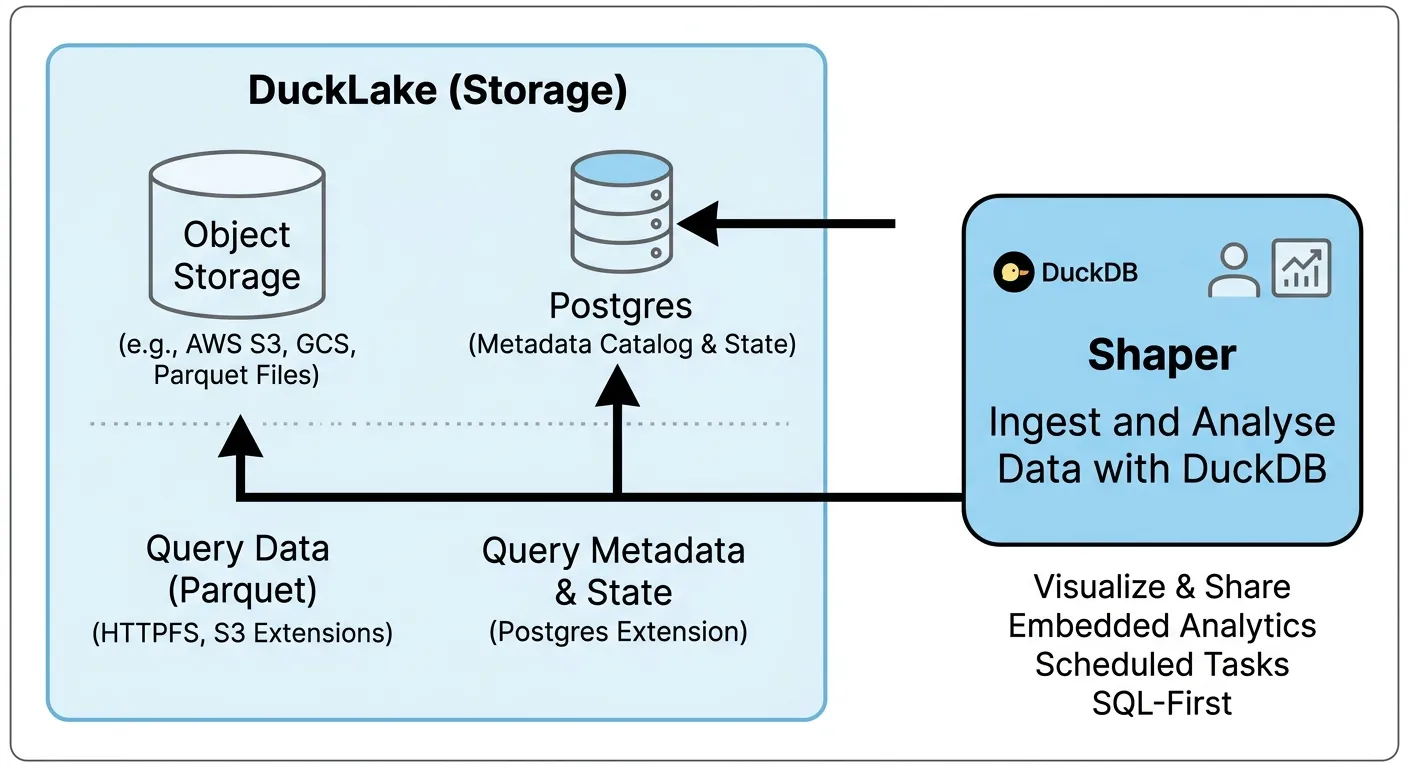
You can build a simple data lake platform that scales from a $5 VM to petabytes of data with these three open source tools: DuckDB, DuckLake, and Shaper.
What Does a Data Platform Need?
Section titled “What Does a Data Platform Need?”A minimal data platform requires at least three components:
- Data Storage
- Data Ingestion and Transformation
- Data Analysis and Visualization
Let’s go over them one by one:
Data Storage
Section titled “Data Storage”When you have only a small amount of data you can use DuckDB to directly query your production database such as Postgres, but as your data grows that gets slow and expensive.
One alternative is to replicate data to a data warehouse such as Snowflake, BigQuery, Redshift or even Clickhouse. But warehouses are complex to operate and expensive.
That’s where data lakes come in:
What’s a Data Lake?
Section titled “What’s a Data Lake?”Building a data lake architecture means storing data as files in a cheap object storage such as S3.
Data is then stored in a format optimized for analytics such as Parquet files. And DuckDB can query those files really efficiently - fast enough for most use cases even with large amounts of data.
But Parquet files are read-only. To update data you need to create a new file. So you quickly end up with a large number of files that you need to manage and the need to rewrite files for better performance.
That’s why a data lake needs a metadata layer - a catalog of all the data.
Once you have a catalog, using a data lake feels just like using a database:
You create, update and insert into tables without thinking about Parquet files. The catalog automatically rewrites and optimizes the files for you as needed.
Why DuckLake?
Section titled “Why DuckLake?”The most popular implementation of such a catalog is Apache Iceberg. Cloud providers offer Iceberg as a service (for example AWS S3 Tables and Cloudflare R2 Data Catalog).
And DuckDB has great support for Iceberg.
If your infrastructure provider already supports Iceberg on top of its object storage and you don’t mind paying the premium for that, that’s a great option for a data lake.
However, to run your own data lake on top of any object storage, DuckLake is much simpler than running your own Iceberg implementation.
DuckLake doesn’t require any additional services to run. It works with any object storage and supports many databases for its catalog.
If you have an S3-compatible service and a Postgres database, you can start using DuckLake without any new infrastructure.
Running DuckLake and Shaper
Section titled “Running DuckLake and Shaper”We can run a complete data lake platform in a simple docker-compose setup:
- Minio for object storage
- Postgres for the DuckLake catalog
- Shaper to run DuckDB and provide a UI for querying and scheduling jobs
services:  minio:    image: minio/minio    restart: unless-stopped    command: server /data --console-address ":9001"    environment:      MINIO_ROOT_USER: minioadmin      MINIO_ROOT_PASSWORD: minioadmin    volumes:      - minio_data:/data    healthcheck:      test: ["CMD", "mc", "ready", "local"]      interval: 5s      timeout: 5s      retries: 10
  minio-init:    image: minio/mc    depends_on:      minio:        condition: service_healthy    entrypoint: >      /bin/sh -c "        mc alias set local http://minio:9000 minioadmin minioadmin &&        mc mb --ignore-existing local/ducklake &&        echo 'Bucket ducklake ready.'      "    restart: "no"
  postgres:    image: postgres:16    restart: unless-stopped    environment:      POSTGRES_USER: ducklake      POSTGRES_PASSWORD: ducklake      POSTGRES_DB: ducklake    volumes:      - postgres_data:/var/lib/postgresql/data    healthcheck:      test: ["CMD-SHELL", "pg_isready -U ducklake -d ducklake"]      interval: 5s      timeout: 5s      retries: 10
  shaper:    image: taleshape/shaper    restart: unless-stopped    depends_on:      postgres:        condition: service_healthy      minio-init:        condition: service_completed_successfully    ports:      - "5454:5454" # UI → http://localhost:5454    volumes:      - ./init.sql:/init.sql:ro    environment:      SHAPER_INIT_SQL_FILE: /init.sql      MINIO_KEY_ID: minioadmin      MINIO_SECRET: minioadmin      MINIO_ENDPOINT: minio:9000      MINIO_BUCKET: ducklake      PG_HOST: postgres      PG_PORT: "5432"      PG_DB: ducklake      PG_USER: ducklake      PG_PASSWORD: ducklake
volumes:  minio_data:  postgres_data:  shaper_data:
We also need to configure Shaper to set up the secrets for DuckLake.
We can do that in a separate init.sql file that Shaper executes on startup:
CREATE OR REPLACE SECRET minio_secret (    TYPE s3,    KEY_ID '${MINIO_KEY_ID}',    SECRET '${MINIO_SECRET}',    REGION 'us-east-1',    ENDPOINT '${MINIO_ENDPOINT}',    URL_STYLE 'path',    USE_SSL false);
CREATE OR REPLACE SECRET pg_secret (    TYPE postgres,    HOST '${PG_HOST}',    PORT ${PG_PORT},    DATABASE '${PG_DB}',    USER '${PG_USER}',    PASSWORD '${PG_PASSWORD}');
CREATE SECRET ducklake_secret (    TYPE ducklake,    METADATA_PATH '',    DATA_PATH 's3://${MINIO_BUCKET}/',    METADATA_PARAMETERS MAP {'TYPE': 'postgres', 'SECRET': 'pg_secret'});
ATTACH 'ducklake:ducklake_secret' AS ducklake;
You can start the setup by running docker compose up -d in the directory where you created the docker-compose.yml and init.sql files.
Ingesting and Transforming Data
Section titled “Ingesting and Transforming Data”We can use Shaper’s Task feature as a simple scheduling system to run SQL queries that ingest and transform data in our data lake:
- Open http://localhost:5454 in your browser.
- Click on New and select Task at the top.
- Copy and paste the following SQL:
SELECT NULL::SCHEDULE;CREATE TABLE IF NOT EXISTS ducklake.sessions AS SELECT * FROM 'https://taleshape.com/sample-data/sessions.csv';- Click on “Create” at the top right and give the task a name such as “Ingest Sessions Data”.
- Now click on “Run” in the top right corner.
Congrats, you’ve loaded your first data into DuckLake!
For real use cases you would want to schedule tasks to run automatically and then you would use for example MERGE INTO to update your data lake continuously.
And of course not only Shaper can access DuckLake. For more complex setups you can introduce other tools for your data pipelines such as DBT and Dagster.
Analyze and Visualize Data
Section titled “Analyze and Visualize Data”Once we have data in our data lake we can now query it.
Let’s build a first Shaper dashboard on top of DuckLake:
- In the Shaper UI click on New and select Dashboard at the top.
- Copy and paste the following SQL:
SELECT count(*) AS "Total Sessions"FROM ducklake.sessions;
SELECT 'Sessions per Week'::LABEL;SELECT date_trunc('week', created_at)::XAXIS, category::CATEGORY, count(*)::BARCHART_STACKED,FROM ducklake.sessions GROUP BY ALL ORDER BY ALL;- Click on “Create” at the top right and give the dashboard a name such as “Sessions Dashboard”.
Congrats, you just built your first dashboard on top of your data lake!
You can learn more about building dashboards in Shaper in the Getting Started Guide.
Deploying to Production
Section titled “Deploying to Production”You now have a minimal, but complete data lake platform that you can build interesting data products on top of.
But for now this is only running on your computer locally. Now it’s time to deploy this setup into a production infrastructure.
The cheapest way to get started is to simply run all services on a single server, almost identical to how we did above.
But you wouldn’t need a data lake if you have so little data that it fits on a single machine.
Instead, you want to make use of an existing object storage service which almost every hosting provider offers.
Recommended: Hetzner
Section titled “Recommended: Hetzner”If you are looking for a more affordable hosting provider or prefer a European provider over the big American cloud providers, I recommend you look into Hetzner (referral to get free 20€).
You get a VM for 3.49€ and 1TB of object storage for 4.99€, hosted in Germany.
Just be careful that there are some gotchas with Hetzner’s object storage. To make sure your setup is properly secured, check out this detailed guide by my friend Floyd:
And if you are looking for fully-managed Shaper connected to your data lake and integrated into your systems, check out Taleshape’s Managed Hosting and Support Plans.